Tackling a tight rubber hose and fitting connection can be a frustrating challenge, whether you’re working on automotive, plumbing, or hydraulic projects. A stubborn hose that won’t slide onto a barbed fitting risks leaks and system failure if installed improperly. This guide offers proven techniques to make the job easy.
We’ll walk you through simple, effective methods to soften and expand the rubber just enough for a smooth fit. From using hot water or a heat gun to selecting the right lubricant, you’ll learn the tricks professionals use to achieve a tight, secure, and leak-proof seal without damaging your components.
How to Get Rubber Hose on Fitting?
Tackling a tight rubber hose and fitting connection requires simple tricks to ensure a secure, leak-proof seal. By slightly expanding the hose, you can easily slide it over a barbed coupling for a perfect fit every time.
Step 1: Check Sizing and Clean Components
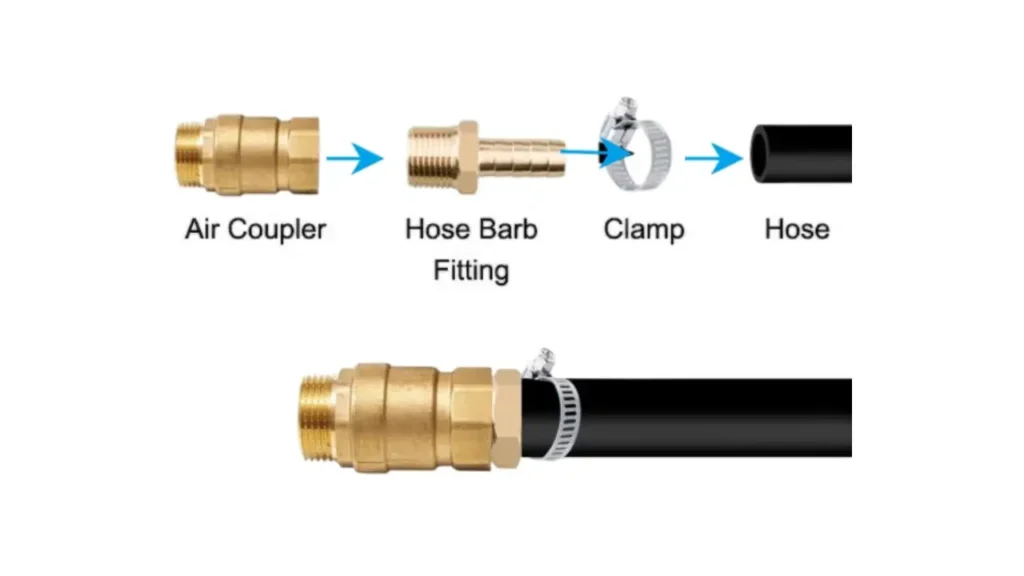
Proper preparation ensures a smooth installation. First, make sure both the hose and fitting are clean and free of debris that could damage the connection or create a leak path. Double-check that the hose’s inside diameter (ID) matches the fitting’s outside diameter (OD) for a snug fit.
A tight fit is necessary for a strong seal, but it makes installation challenging. To overcome this, ensure your cutting of the hose is straight and neat, as frayed ends or an unmatched size will complicate the rest of the process and potentially lead to leaks under pressure.
Step 2: Apply a Safe Lubricant
The friction between the rubber hose and the metal or plastic barbs is the primary source of difficulty. To reduce this resistance, apply a safe, non-petroleum-based lubricant like a water-soluble soap, silicone spray, or specialized assembly lube to the outer surface of the fitting’s barbs.
It is crucial to use a lubricant that is chemically compatible with the rubber and the fluid being transferred. Petroleum products (like grease or oil) should be avoided as they can degrade rubber and cause the hose to weaken, swell, or fail over time, compromising the integrity of the connection.
Step 3: Soften the Rubber with Heat
The most effective technique is to make the rubber more pliable. Carefully submerge the end of the hose for 30–60 seconds in very hot (not boiling) water or apply gentle heat using a heat gun or hairdryer. The heat causes the rubber to slightly expand and soften.
This controlled heating relaxes the rubber material, allowing it to stretch more easily over the fitting. Be careful not to overheat the hose, which can cause permanent damage, cracking, or degradation. The goal is pliability, not melting or blistering.
Step 4: Insert the Hose with a Twist
Working quickly while the hose is warm, the softened rubber will temporarily stretch, allowing it to slide over the lubricated fitting much more easily. Push the warmed, lubricated hose onto the fitting using a steady, firm, and slightly twisting motion to help the barbs engage.
Avoid pushing straight on, as this can be extremely difficult. The twisting action helps the leading edge of the hose lip over each barb sequentially. If the hose cools and becomes stiff halfway through, remove it, re-heat it, and try again quickly.
Step 5: Fully Seat and Clamp the Connection
Ensure the hose is fully seated against the fitting’s stop collar, past all the barbs, for maximum security and leak prevention. Visually confirm that the entire barbed surface is covered and that the hose is not crimped or bulging anywhere.
Finally, slide a hose clamp into position, making sure it sits directly over the barbed section of the fitting, and tighten it securely. This provides the final reinforcement against pressure and prevents the hose from slipping off the fitting during operation.
How to Get Rubber Hose off Fitting?
Removing a rubber hose that has fused tightly to a barbed fitting can be a frustrating challenge. With the right technique, you can break the seal and safely remove the hose without causing damage.
Step 1: Depressurize and Remove the Clamp
Before starting, ensure the system is completely depressurized and any fluid (oil, coolant, etc.) is drained or contained to prevent spills. Use the appropriate tool—a screwdriver or hose clamp pliers—to loosen and slide the hose clamp completely off the fitting and away from the rubber.
Attempting to remove the hose while the clamp is still engaged will make the job impossible and can damage both the clamp and the hose. Once the clamp is clear, give the hose a firm, gentle twist by hand to see if the seal has broken.
Step 2: Break the Internal Seal with Twisting
The primary difficulty in removal is the vacuum-like seal and adhesion the hose forms around the barbs over time. Grasp the hose firmly with pliers or a rag for better grip, and twist it back and forth aggressively but gently.
The twisting motion is designed to break the static bond between the inner rubber wall and the fitting’s barbs, which is far more effective than simply pulling. Avoid pulling straight off, as this tends to make the hose collar constrict and grip the fitting even tighter.
Step 3: Use a Pick or Tool to Pry the Seal
If twisting alone fails, you need to physically separate the rubber from the metal. Carefully insert a thin, angled hose pick or a small, blunt, flat-blade screwdriver (avoiding sharp edges) between the hose end and the fitting lip.
Gently work the tool all the way around the circumference of the fitting. This action introduces air and separates the stuck rubber from the barbs, effectively breaking the seal. Be cautious to push the tool only between the hose and fitting, avoiding the underlying metal surface to prevent scratching.
Step 4: Soften Hardened Hoses with Heat or Lubricant
For old, hardened, or extremely stuck hoses, the rubber itself must be softened. Apply controlled, moderate heat using a heat gun or hairdryer directly to the hose material near the fitting for about one minute. Alternatively, spray a penetrating oil or silicone lubricant into the gap created in the previous step, allowing it to soak for a few minutes.
The heat will make the rubber pliable, enabling it to stretch slightly and release its grip. Lubricants, particularly penetrating oils, will dissolve any corrosion or dried-out residue that is cementing the hose to the fitting, allowing it to slide off more easily.
Step 5: Final Removal or Cutting
Once the seal is broken and the hose is loosened, apply a final steady, firm pull while continuing the twisting motion to slide the hose completely off the fitting. If you intend to reuse the hose, inspect the end for damage before reinstalling.
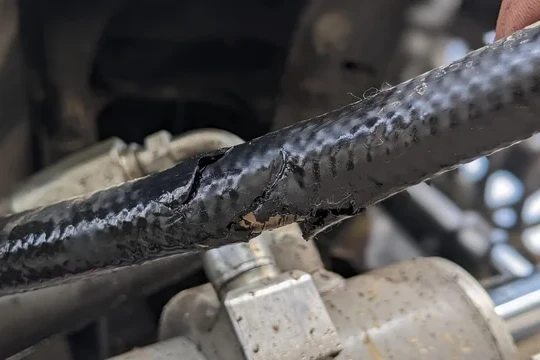
If the hose is cracked, brittle, or completely fused and all other methods fail, the safest final option is to cut the hose. Use a sharp utility knife to carefully slice the hose lengthwise along the barb, avoiding contact with the fitting, then peel the hose section away.
How to Remove Rubber Hose From Barbed Fitting?

Removing a rubber hose that has fused tightly to a barbed fitting can be a frustrating challenge. With the right technique, you can break the seal and safely remove the hose without causing damage.
Step 1: Depressurize and Remove the Clamp
Before starting, ensure the system is completely depressurized and any fluid (oil, coolant, etc.) is drained or contained to prevent spills. Use the appropriate tool—a screwdriver or hose clamp pliers—to loosen and slide the clamp completely off the fitting and away from the rubber.
Attempting to remove the hose while the clamp is still engaged will make the job impossible and can damage both the clamp and the hose. Once the clamp is clear, give the hose a firm, gentle twist by hand to see if the seal has broken before applying further force.
Step 2: Break the Internal Seal with Twisting
The primary difficulty in removal is the vacuum-like seal and adhesion the hose forms around the barbs over time. Grasp the hose firmly with hose pliers or a rag for better grip, and twist it back and forth aggressively but gently near the fitting.
The twisting motion is designed to break the static bond between the inner rubber wall and the fitting’s barbs, which is far more effective than simply pulling straight off. Pulling straight tends to constrict the hose collar, making it grip the fitting tighter and potentially tearing the rubber.
Step 3: Use a Pick or Tool to Pry the Seal
If twisting alone fails, you need to physically separate the rubber from the metal. Carefully insert a thin, angled hose pick or a small, blunt, flat-blade screwdriver (avoiding sharp edges) between the hose end and the fitting lip to create a gap.
Gently work the tool all the way around the circumference of the fitting, making sure the pick stays between the hose and the metal. This action introduces air and mechanically separates the stuck rubber from the barbs, effectively breaking the stubborn seal.
Step 4: Soften Hardened Hoses with Heat
For old, hardened, or extremely stuck hoses, the rubber itself must be made pliable. Apply controlled, moderate heat using a heat gun or hairdryer directly to the hose material near the fitting for about 30-60 seconds, moving it constantly to ensure even heating.
The heat will cause the rubber to temporarily expand and soften, enabling it to stretch slightly and release its grip on the barbs. Be careful not to use excessive heat, especially on plastic fittings or older hoses, as this can cause permanent damage, melting, or cracking.
Step 5: Apply Lubricant for Final Release
With the seal broken and the hose warmed, apply a few drops of silicone spray or a penetrating oil (like WD-40, if compatible with the system) into the gap where you used the pick. Let the lubricant soak in for a minute or two.
The lubricant drastically reduces the friction between the rubber and the metal barbs. Re-grip the hose firmly and, while continuing the gentle back-and-forth twisting motion, pull the hose straight off the fitting with steady force.
Step 6: Cutting the Hose (Last Resort)
If the hose is cracked, brittle, or completely fused and all other methods have failed, the safest final option is to cut the hose. Use a sharp utility knife to carefully make a longitudinal slit (lengthwise) along the hose, cutting only through the rubber and avoiding contact with the fitting.
Once a cut is made, you can gently pry the hose open and peel the section away from the barb, which saves the fitting from damage. Since this ruins the hose end, you must trim the hose shorter before reinstallation or use a new hose.
Conclusion
Successfully installing a rubber hose on a fitting ensures a durable, leak-free system that will perform reliably under pressure. By utilizing the simple techniques we covered—like controlled heating and proper lubrication—you can avoid damaged parts and frustrating installation struggles. Remember to always secure the finished connection with the correct hose clamp for maximum operational safety and longevity.
Applying these pro tips will save you time, effort, and prevent costly replacements down the line. A correctly seated hose not only functions better but gives you confidence in your entire assembly. Keep these methods in your toolkit for any future project involving flexible hoses and barbed or coupled connections.
Ready to tackle your next big project or stock up on reliable components? For all your industrial, chemical, or hydraulic needs, remember you can get wholesale rubber hoses from our Kingdaflex. We offer a wide range of durable, high-quality hoses and fittings designed for easy installation and peak performance.


